JavaFX程序打包为EXE桌面应用程序
2016-07-24JavaFX攻城狮56780°c
A+ A-我们在用JavaFX编写应用程序的时候一般情况下生成的都是可执行的jar文件,但是这种文件只有在电脑安装了JRE的情况下才可以正常运行起来,而且还依赖于特定版本的jre,所以直接将这种文件发给用户,基本上百分之八十的可能都是运行失败。
当然,为了避免这种问题,可运行的jar还可以通过JNLP协议分发,这种协议可以保证用户运行你打包好的jar文件时自动准备好合适的jre环境,基本上理论上来说成功率可达99%(没有绝对的事情,所以不是100%),但是我大概体验过几个,都是需要比较麻烦的java设置,会有各种提示,基本上需要一定计算机基础的用户才可以使用。
我这里要介绍的就是将可执行的jar文件打包为Windows系统中的exe应用程序,要达到的目的就是即便用户电脑里面没有jre,也照样可以运行你打包好的应用程序。
开发JavaFX的IDE很多,我这里不会一一例举,我本人写JavaFX程序的时候习惯用NetBeans,所以我下面的例子是以NetBeans8.1为例。
下面开始介绍打包过程:
一、创建可执行的jar文件
在NetBeans中选择“文件---新建项目”,弹出如下图所示的框,在类别中选择“样例-----JavaFX”,随便选一个项目:
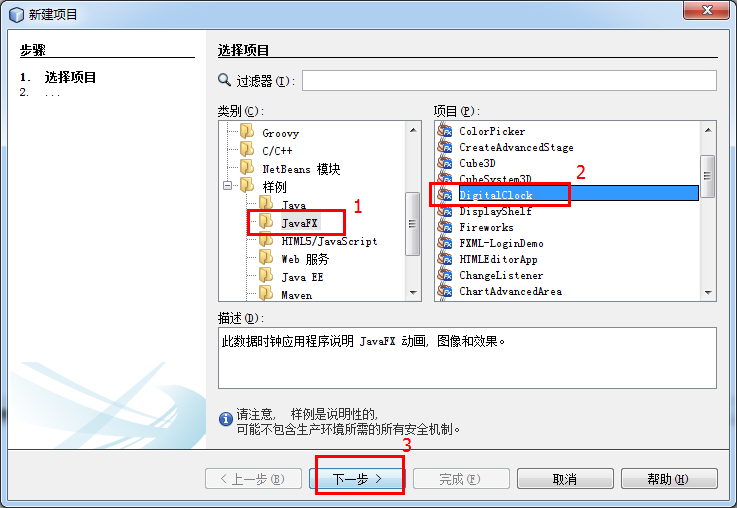
点击下一步后,填写项目名,至于项目位置,根据自己的情况选择,我这里默认不变:
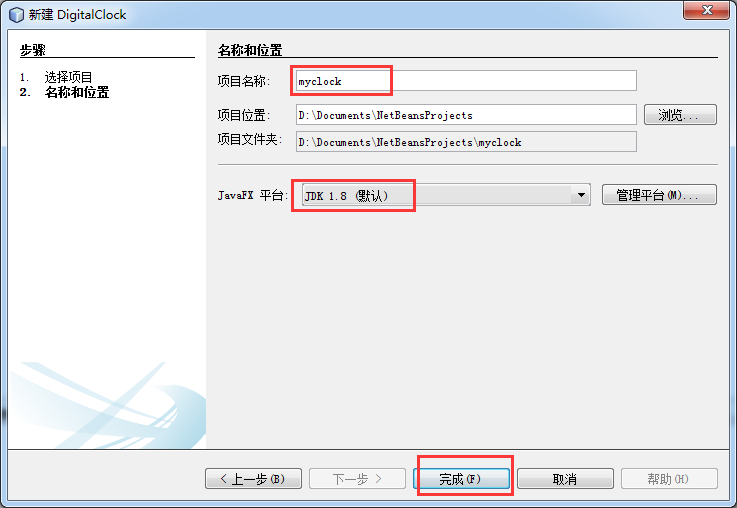
javafx最低要求是JDK8,这个需要注意,点击完成按钮就创建好了一个JavaFX项目,在新创建的项目上面点击右键,选择运行,可以看到运行效果如下图所示:
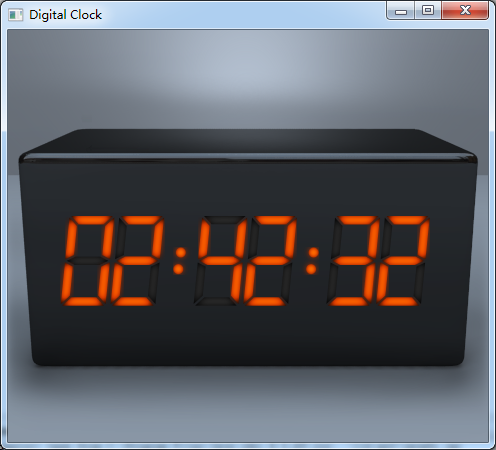
好了,现在我们已经有一个可执行的jar文件了,但是这里为了真实一些,我需要重点说一下,在真实的项目中,除了程序代码本身,我们还会用到类似于配置文件、图片等外部资源,大部分项目都需要依赖于第三方的jar包,所以我准备修改一下代码,为项目引入一个commons-lang.jar包,并且为项目使用一个配置文件。
展开项目,在项目的“库”上面点击右键,选择“添加jar/文件夹”选项:
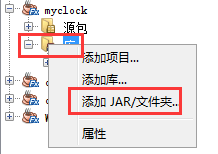
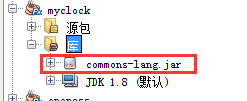
然后在弹出的窗口中选择要导入的jar文件,导入后可以看到“库”中包含了commons-lang.jar,
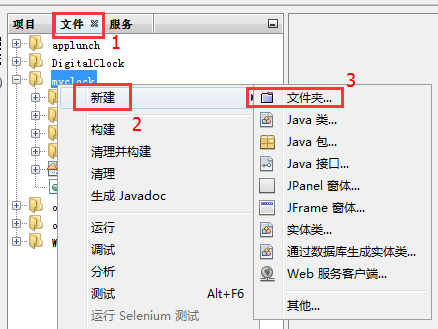
下面为项目添加一个配置文件,首先把左侧项目视图更改为文件视图,然后在项目名上点击右键,选择“新建---文件夹”,如下图所示:
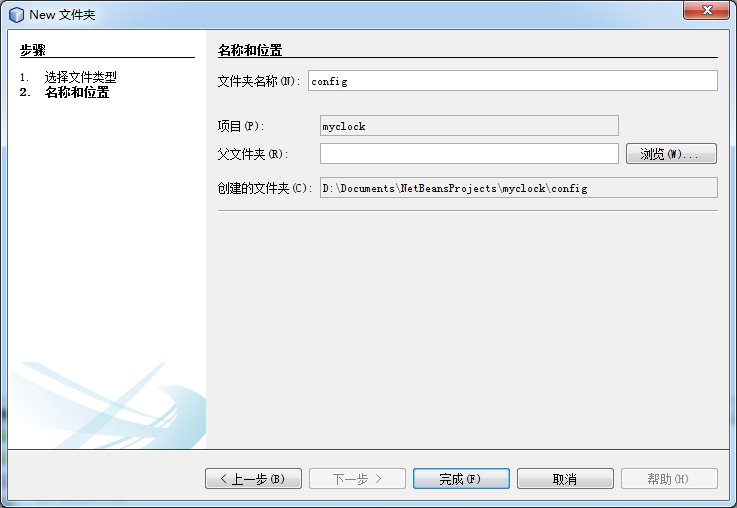
在弹出的框中为新建的文件夹命名,我这里命名为config,然后点击完成:
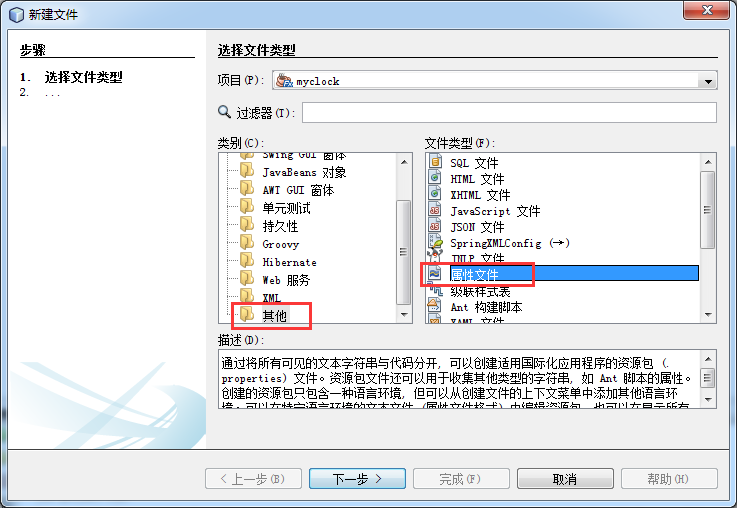
在新建的文件夹上面点击右键,选择“新建---其他“选项
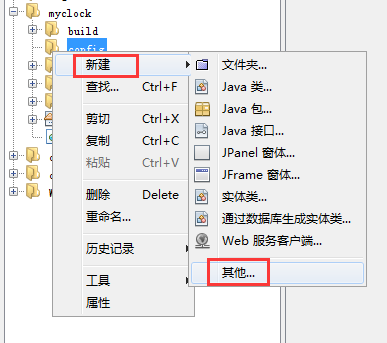
在弹出的窗口中选择”其他---属性文件“
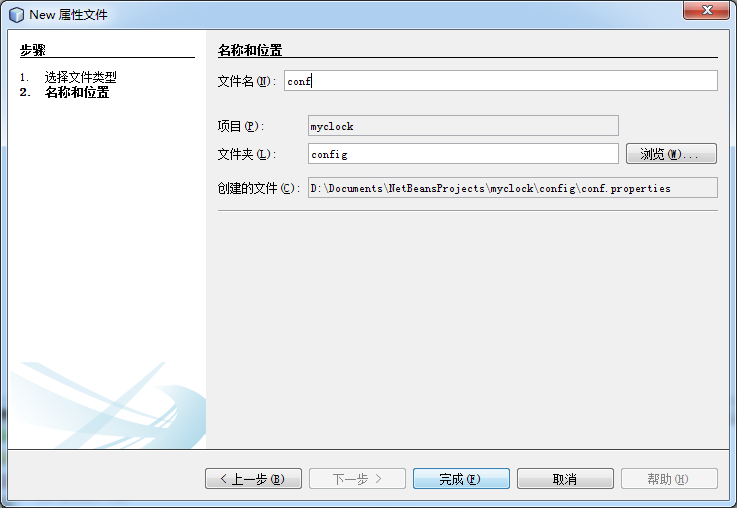
然后点击下一步,在弹出的窗口中为新建的属性文件命名,我这里写为conf
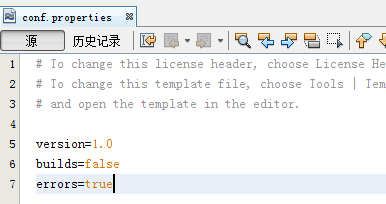
点击完成后,我们打开属性文件,在里面写点配置,让程序读取配置文件中信息
好了,我在代码中添加了如下几行代码:
Map<String,String> map=new HashMap<>();
        primaryStage.setOnCloseRequest(e->{
            try {
                Properties pro=new Properties();
                pro.load(new FileReader("./config/conf.properties"));

                System.out.println("读取系统配置信息:");
                Enumeration<?> propertyNames = pro.propertyNames();
                while(propertyNames.hasMoreElements()){
                    Object nextElement = propertyNames.nextElement();
                    String get = (String)pro.get(nextElement);
                    if(StringUtils.isNotBlank(get)&&StringUtils.isNotBlank((String)nextElement));
                    map.put((String)nextElement, get);

                }
                Alert alert=new Alert(AlertType.INFORMATION);
                alert.setHeaderText("读取的conf.properties配置文件的信息如下:");
                alert.setContentText(map.toString());
                alert.showAndWait();
            } catch (IOException ex) {
                Logger.getLogger(DigitalClock.class.getName()).log(Level.SEVERE, null, ex);
            }
        });
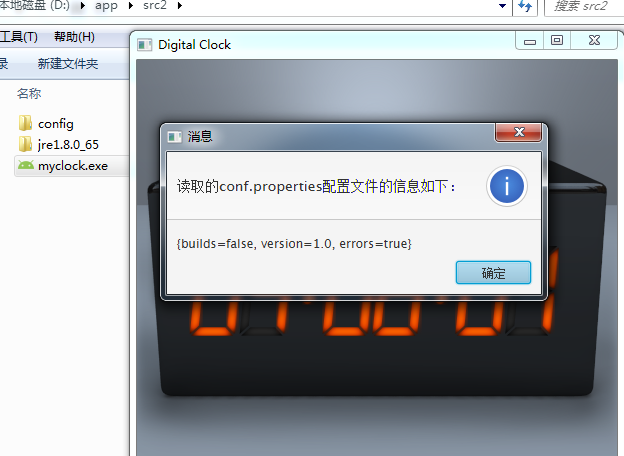
可以看到我在代码中读取了配置文件信息,并且在点击窗口右上角的关闭按钮时弹出读取到的配置信息,并且在读取的时候用引入的第三方jar包中的StringUtils类,所以说,如果后期我们打包的时候如果弄错了,那么运行的时候肯定会报错,如果打包完毕后可以正常运行,并且能够显示出读取到的配置信息,那么就代表打包成功了。下面是我当前的运行状态:
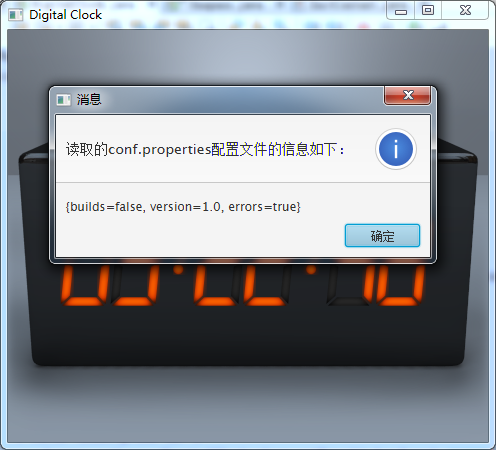
下面是完整的代码;
package digitalclock;

import java.io.FileReader;
import java.io.IOException;
import java.util.Calendar;
import java.util.Enumeration;
import java.util.HashMap;
import java.util.Map;
import java.util.Properties;
import java.util.logging.Level;
import java.util.logging.Logger;
import javafx.animation.KeyFrame;
import javafx.animation.Timeline;
import javafx.application.Application;
import javafx.event.ActionEvent;
import javafx.event.EventHandler;
import javafx.scene.Group;
import javafx.scene.Parent;
import javafx.scene.Scene;
import javafx.scene.control.Alert;
import javafx.scene.control.Alert.AlertType;
import javafx.scene.effect.Effect;
import javafx.scene.effect.Glow;
import javafx.scene.effect.InnerShadow;
import javafx.scene.image.Image;
import javafx.scene.image.ImageView;
import javafx.scene.paint.Color;
import javafx.scene.shape.Circle;
import javafx.scene.shape.Polygon;
import javafx.scene.transform.Scale;
import javafx.scene.transform.Shear;
import javafx.stage.Stage;
import javafx.util.Duration;
import org.apache.commons.lang.StringUtils;

/**
 * A digital clock application that demonstrates JavaFX animation, images, and
 * effects.
 *
 * @see javafx.scene.effect.Glow
 * @see javafx.scene.shape.Polygon
 * @see javafx.scene.transform.Shear
 * @resource DigitalClock-background.png
 */
public class DigitalClock extends Application {

    private Clock clock;

    @Override
    public void start(Stage primaryStage) {
        primaryStage.setTitle("Digital Clock");
        Group root = new Group();
        Scene scene = new Scene(root, 480, 412);
        // add background image
        ImageView background = new ImageView(new Image(getClass().getResourceAsStream("DigitalClock-background.png")));
        // add digital clock
        clock = new Clock(Color.ORANGERED, Color.rgb(50,50,50));
        clock.setLayoutX(45);
        clock.setLayoutY(186);
        clock.getTransforms().add(new Scale(0.83f, 0.83f, 0, 0));
        // add background and clock to sample
        root.getChildren().addAll(background, clock);
        primaryStage.setScene(scene);
        primaryStage.show();
         Map<String,String> map=new HashMap<>();
        primaryStage.setOnCloseRequest(e->{
            try {
                Properties pro=new Properties();
                pro.load(new FileReader("./config/conf.properties"));

                System.out.println("读取系统配置信息:");
                Enumeration<?> propertyNames = pro.propertyNames();
                while(propertyNames.hasMoreElements()){
                    Object nextElement = propertyNames.nextElement();
                    String get = (String)pro.get(nextElement);
                    if(StringUtils.isNotBlank(get)&&StringUtils.isNotBlank((String)nextElement));
                    map.put((String)nextElement, get);

                }
                Alert alert=new Alert(AlertType.INFORMATION);
                alert.setHeaderText("读取的conf.properties配置文件的信息如下:");
                alert.setContentText(map.toString());
                alert.showAndWait();
            } catch (IOException ex) {
                Logger.getLogger(DigitalClock.class.getName()).log(Level.SEVERE, null, ex);
            }
        });
    }

    /**
     * Clock made of 6 of the Digit classes for hours, minutes and seconds.
     */
    public static class Clock extends Parent {
        private Calendar calendar = Calendar.getInstance();
        private Digit[] digits;
        private Timeline delayTimeline, secondTimeline;

        public Clock(Color onColor, Color offColor) {
            // create effect for on LEDs
            Glow onEffect = new Glow(1.7f);
            onEffect.setInput(new InnerShadow());
            // create effect for on dot LEDs
            Glow onDotEffect = new Glow(1.7f);
            onDotEffect.setInput(new InnerShadow(5,Color.BLACK));
            // create effect for off LEDs
            InnerShadow offEffect = new InnerShadow();
            // create digits
            digits = new Digit[7];
            for (int i = 0; i < 6; i++) {
                Digit digit = new Digit(onColor, offColor, onEffect, offEffect);
                digit.setLayoutX(i * 80 + ((i + 1) % 2) * 20);
                digits[i] = digit;
                getChildren().add(digit);
            }
            // create dots
            Group dots = new Group(
                    new Circle(80 + 54 + 20, 44, 6, onColor),
                    new Circle(80 + 54 + 17, 64, 6, onColor),
                    new Circle((80 * 3) + 54 + 20, 44, 6, onColor),
                    new Circle((80 * 3) + 54 + 17, 64, 6, onColor));
            dots.setEffect(onDotEffect);
            getChildren().add(dots);
            // update digits to current time and start timer to update every second
            refreshClocks();
            play();
        }

        private void refreshClocks() {
            calendar.setTimeInMillis(System.currentTimeMillis());
            int hours = calendar.get(Calendar.HOUR_OF_DAY);
            int minutes = calendar.get(Calendar.MINUTE);
            int seconds = calendar.get(Calendar.SECOND);
            digits[0].showNumber(hours / 10);
            digits[1].showNumber(hours % 10);
            digits[2].showNumber(minutes / 10);
            digits[3].showNumber(minutes % 10);
            digits[4].showNumber(seconds / 10);
            digits[5].showNumber(seconds % 10);
        }

        public void play() {
            // wait till start of next second then start a timeline to call refreshClocks() every second
            delayTimeline = new Timeline();
            delayTimeline.getKeyFrames().add(
                    new KeyFrame(new Duration(1000 - (System.currentTimeMillis() % 1000)), new EventHandler<ActionEvent>() {
                        @Override public void handle(ActionEvent event) {
                            if (secondTimeline != null) {
                                secondTimeline.stop();
                            }
                            secondTimeline = new Timeline();
                            secondTimeline.setCycleCount(Timeline.INDEFINITE);
                            secondTimeline.getKeyFrames().add(
                                    new KeyFrame(Duration.seconds(1), new EventHandler<ActionEvent>() {
                                        @Override public void handle(ActionEvent event) {
                                            refreshClocks();
                                        }
                                    }));
                            secondTimeline.play();
                        }
                    })
            );
            delayTimeline.play();
        }

        public void stop(){
            delayTimeline.stop();
            if (secondTimeline != null) {
                secondTimeline.stop();
            }
        }
    }

    /**
     * Simple 7 segment LED style digit. It supports the numbers 0 through 9.
     */
    public static final class Digit extends Parent {
        private static final boolean[][] DIGIT_COMBINATIONS = new boolean[][]{
                new boolean[]{true, false, true, true, true, true, true},
                new boolean[]{false, false, false, false, true, false, true},
                new boolean[]{true, true, true, false, true, true, false},
                new boolean[]{true, true, true, false, true, false, true},
                new boolean[]{false, true, false, true, true, false, true},
                new boolean[]{true, true, true, true, false, false, true},
                new boolean[]{true, true, true, true, false, true, true},
                new boolean[]{true, false, false, false, true, false, true},
                new boolean[]{true, true, true, true, true, true, true},
                new boolean[]{true, true, true, true, true, false, true}};
        private final Polygon[] polygons = new Polygon[]{
                new Polygon(2, 0, 52, 0, 42, 10, 12, 10),
                new Polygon(12, 49, 42, 49, 52, 54, 42, 59, 12f, 59f, 2f, 54f),
                new Polygon(12, 98, 42, 98, 52, 108, 2, 108),
                new Polygon(0, 2, 10, 12, 10, 47, 0, 52),
                new Polygon(44, 12, 54, 2, 54, 52, 44, 47),
                new Polygon(0, 56, 10, 61, 10, 96, 0, 106),
                new Polygon(44, 61, 54, 56, 54, 106, 44, 96)};
        private final Color onColor;
        private final Color offColor;
        private final Effect onEffect;
        private final Effect offEffect;

        public Digit(Color onColor, Color offColor, Effect onEffect, Effect offEffect) {
            this.onColor = onColor;
            this.offColor = offColor;
            this.onEffect = onEffect;
            this.offEffect = offEffect;
            getChildren().addAll(polygons);
            getTransforms().add(new Shear(-0.1,0));
            showNumber(0);
        }

        public void showNumber(Integer num) {
            if (num < 0 || num > 9) num = 0; // default to 0 for non-valid numbers
            for (int i = 0; i < 7; i++) {
                polygons[i].setFill(DIGIT_COMBINATIONS[num][i] ? onColor : offColor);
                polygons[i].setEffect(DIGIT_COMBINATIONS[num][i] ? onEffect : offEffect);
            }
        }
    }

    /**
     * The main() method is ignored in correctly deployed JavaFX
     * application. main() serves only as fallback in case the
     * application can not be launched through deployment artifacts,
     * e.g., in IDEs with limited FX support. NetBeans ignores main().
     * @param args the command line arguments
     */
    public static void main(String[] args) {
        launch(args);
    }
}
好了,到这里我们可执行的jar文件已经准备好了,在NetBeans的项目路径下会有一个dist文件夹,dist文件夹中就有我们刚刚运行的jar文件,我们新建的config文件夹与dist文件夹同级
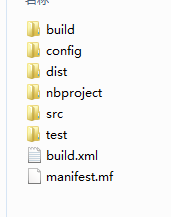
在dist文件夹中我们可以看到一个jar文件,此时你双击这个jar文件可以看到程序可以运行,但是点击关闭按钮的时候没有弹出配置文件信息,因为它现在已经脱离了集成环境,找不到配置文件了。
二、将jar文件打包为exe程序
这里我们需要一个工具:exe4j,版本需要在5.0以上,5.0以下的版本不支持jdk1.8
在D盘创建一个文件夹,命名为app,然后在app文件夹中再创建三个文件夹,分别是src1 src2 out
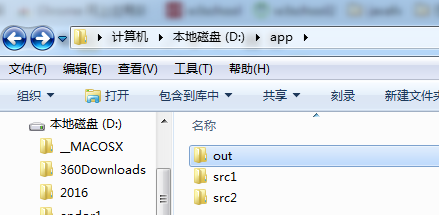
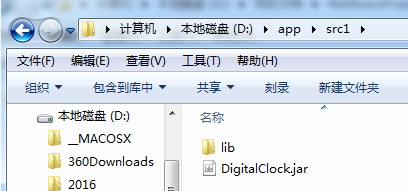
将dist文件夹下的jar文件和lib文件夹拷贝到src1文件夹中
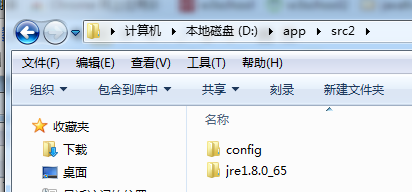
将同dist文件夹平级的config文件夹拷贝到src2文件夹里面,并且找到你本机的jre8文件夹,拷贝到src2文件夹中
将你程序的图标文件放到src1文件夹里面,我这里随便找个ico图标放进去,需要注意的是图标文件必须是正常的,通过更改文件后缀名得到的ico图标文件会报错。
好了,打开exe4j工具,希望在这之前你已经输入过注册码了,没有注册的exe4j打包的程序在运行前会弹框,
打开之后直接点击"next“按钮,然后选择”JAR in EXE" mode,然后点击"next“按钮,输入工程名,选择输出文件夹为src2
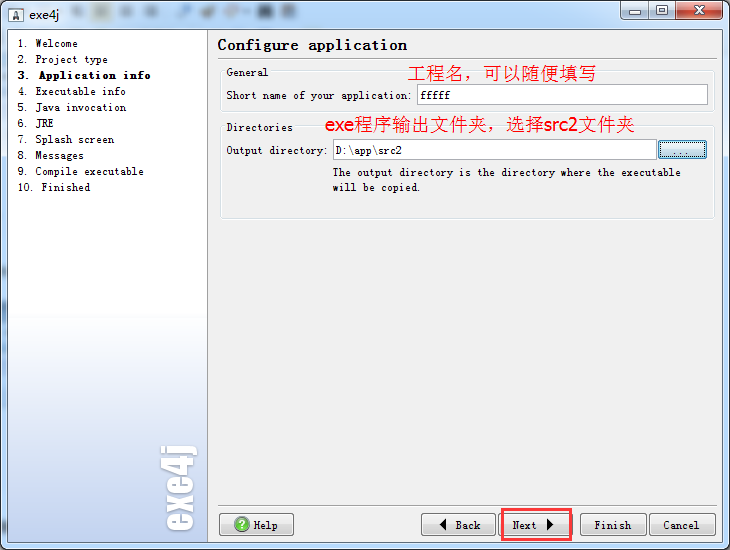
点击"next"按钮,填写应用程序名称为myclock,勾选Icon File复选框,选择放在src1中的图标文件,如果没有图标文件可以不选:
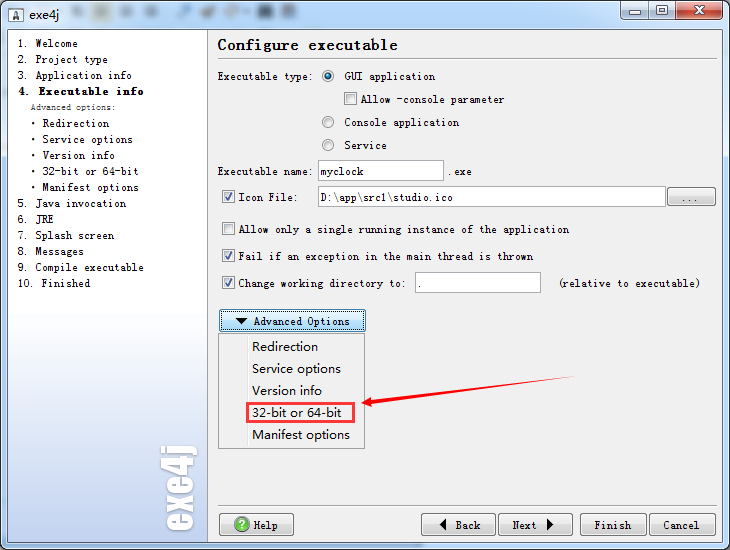
如果你刚刚复制的jre是64bit的,那么需要展开Advanced Options,选择32-bit or 64-bit选项后,在Generate 64-bit executable复选框上打钩,
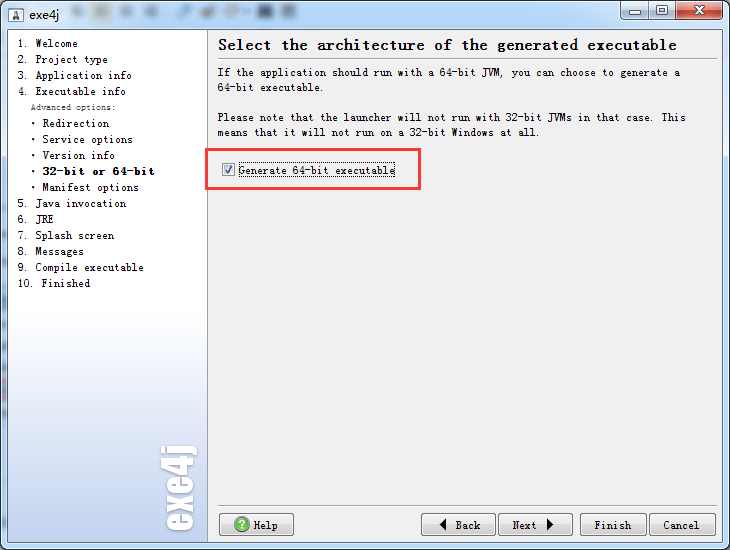
然后点击next,不用管,继续点击next,这里需要添加你的可执行jar文件,
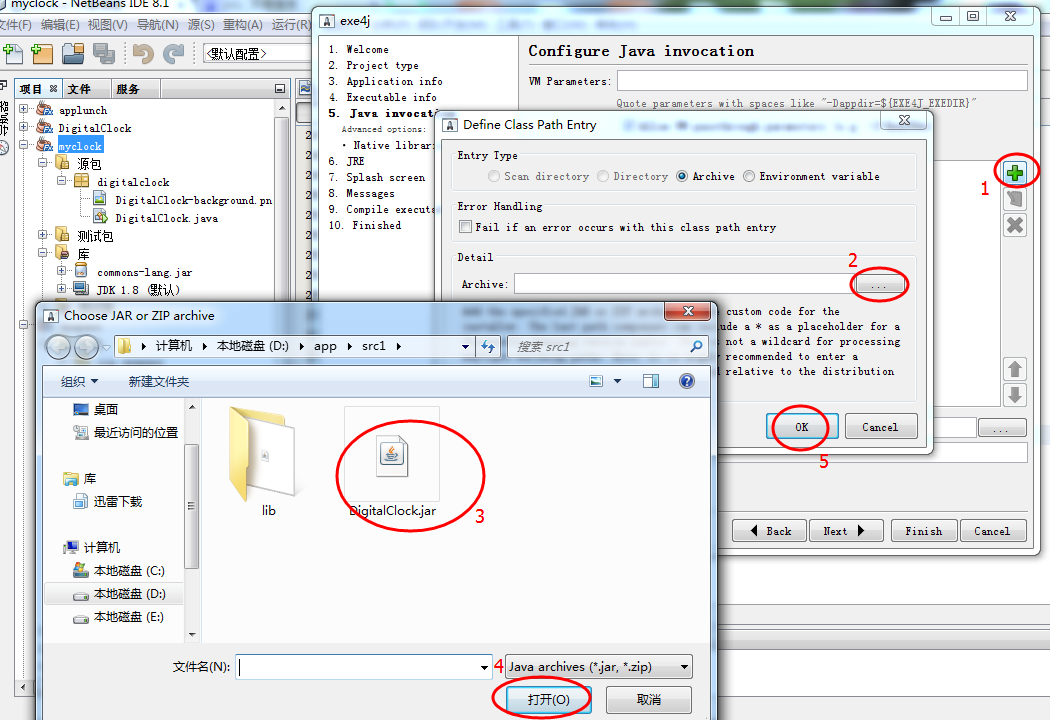
好了,然后点击main class后面的按钮,默认的程序一开始默认的运行类文件:
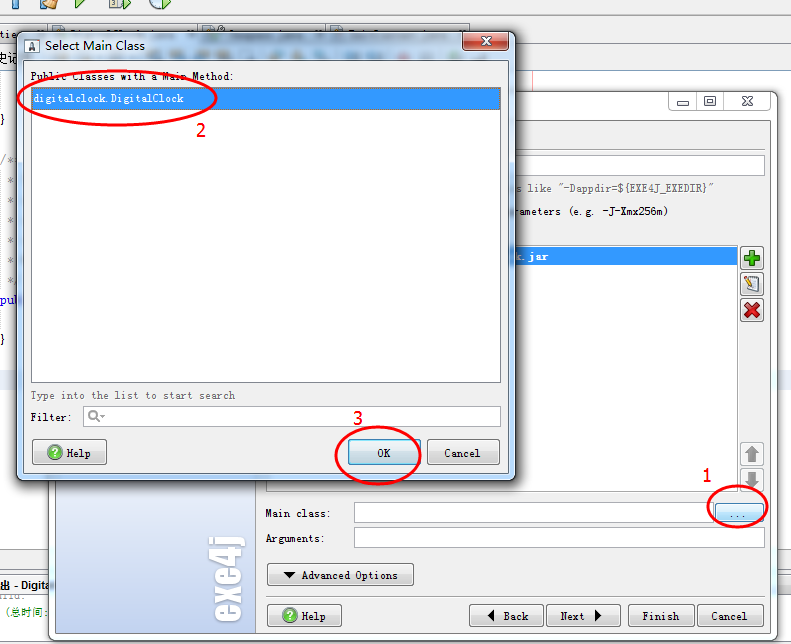
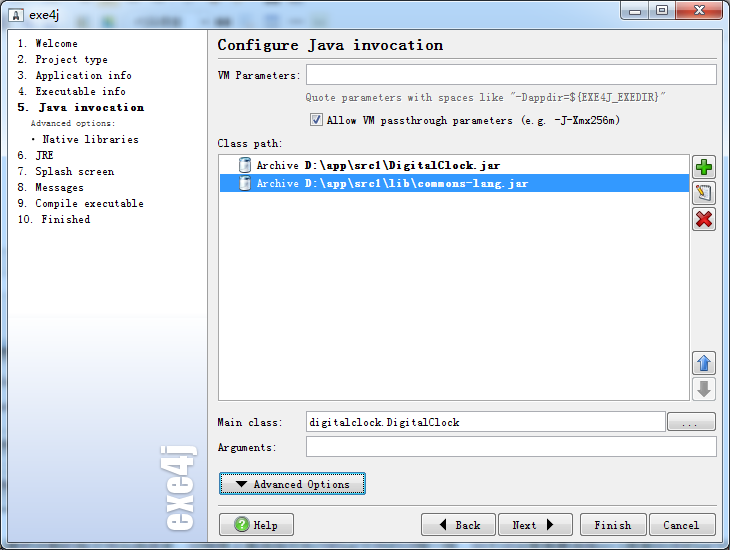
这里,需要注意,因为程序依赖于第三方包,所以要把依赖的包文件也选进来,过程跟上面选择可执行的jar文件的过程一样,只不过这里是要选择src1里面lib中的jar文件,选择完毕后,整个窗口的配置如下图;
点击next按钮,输入最小jre要求和最大jre要求,这里我都写1.8
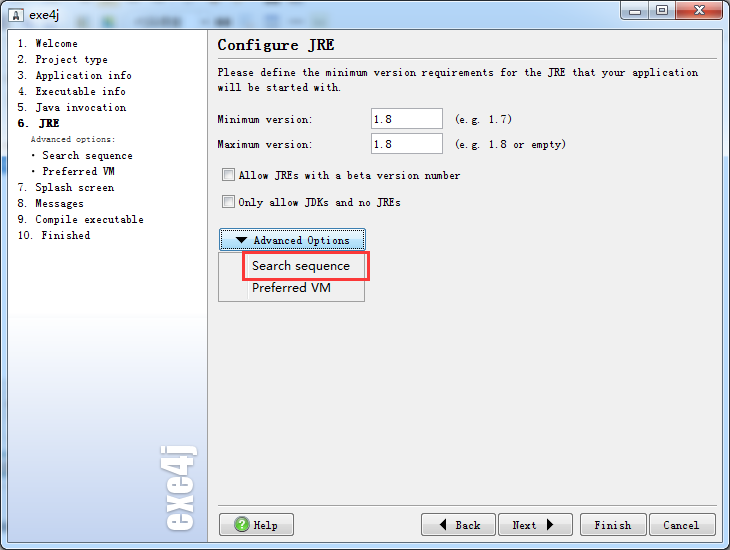
展开下面的Advanced Options,选择Search sqquence选项,将里面的所有条目都删掉(选中后点击右侧的红叉即可),
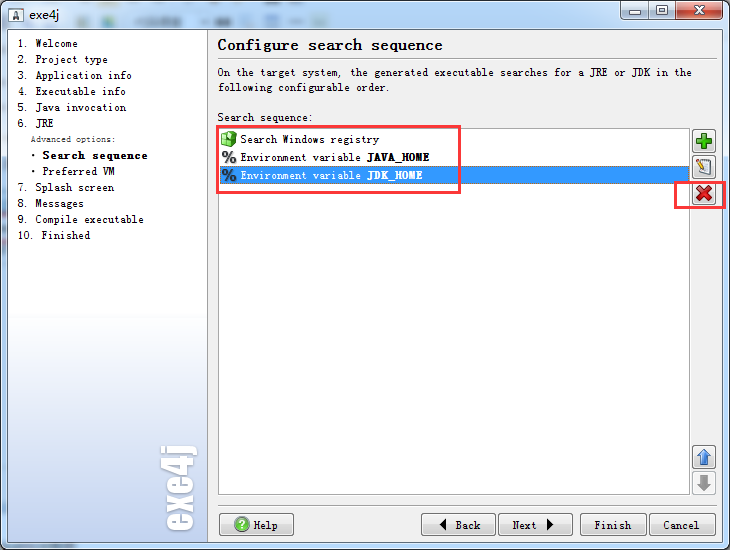
删除完毕后,点击右侧的加号,在弹出的窗口中,将Entry type更改为Directory,然后选择为src2下的jre文件夹
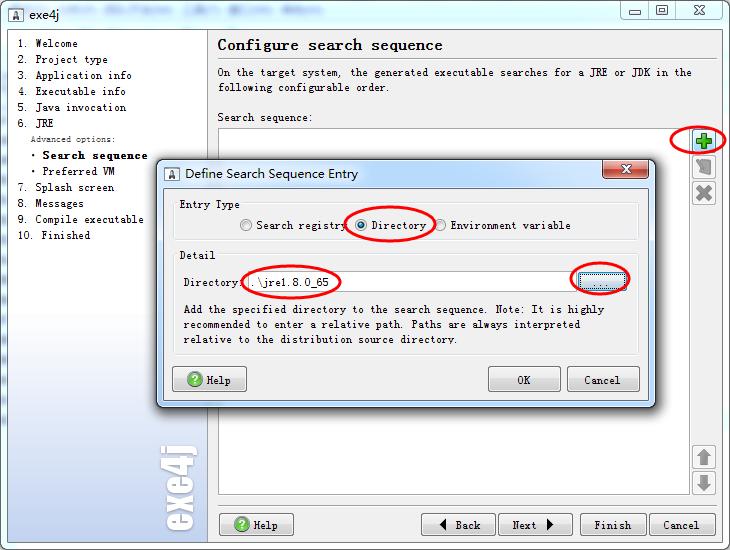
选择完毕后如下图所示:
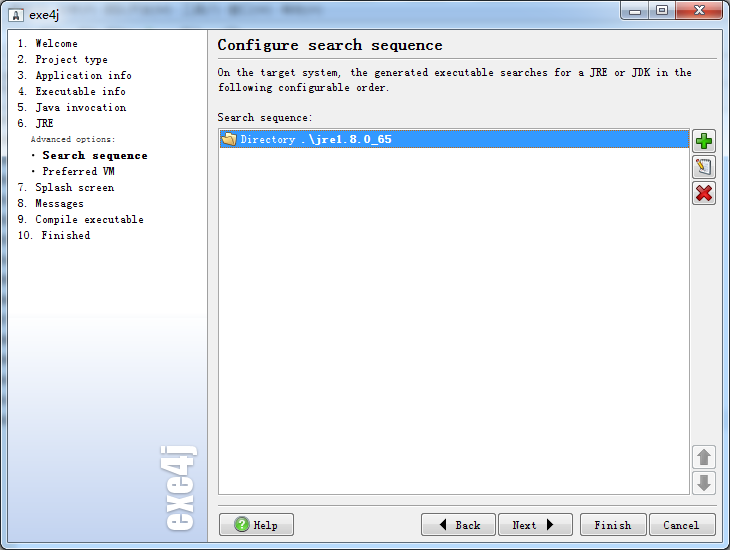
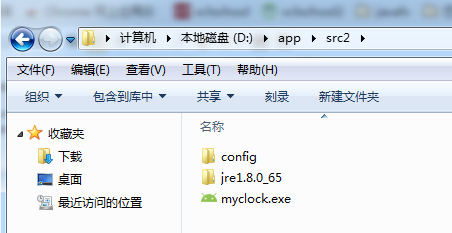
点击next,后面全部不用管,一直点next按钮,知道打包完毕后,可以在src2目录下看到刚刚打包好的myclock.exe文件了,双击后可以正常运行:
三、将所有文件打包成一个安装文件。
其实第二步结束后程序就已经可以在任意计算机正常运行了,但是,有一点比较蛋疼,就是你需要将整个src2文件夹发给别人才可以,单独发送myclock.exe文件却不行,所以为了达到只用一个exe文件就可以完美运行的目的,进行第三步操作。
这里我们需要使用一个工具:Inno Setup 5
打开后,选择“用脚本向导创建新的脚本文件,点击下一步,默认不管,再点击下一步,填写应用程序名、版本、公司、网站等信息
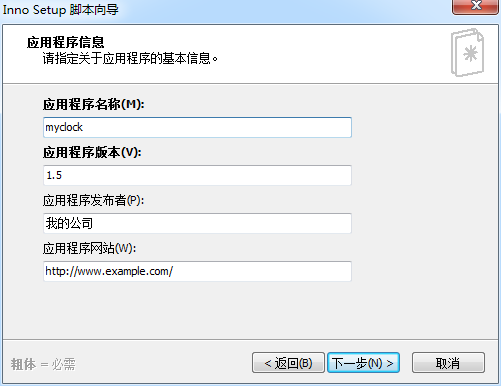
点击下一步,不做改动,再点击下一步,将主程序选择为src2文件夹里面的myclock.exe文件,然后点击下面的“添加文件夹”,选中src2文件夹,提示你是否选中子文件夹,选择是
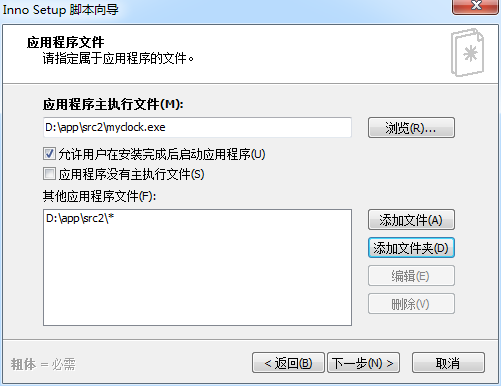
点击下一步,根据需要自行勾选
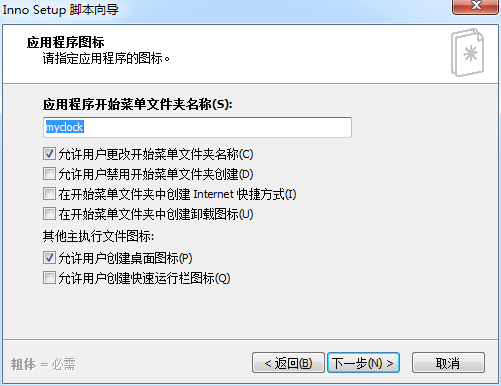
在点击下一步,如果需要许可文件,就准备个txt文件,将许可信息添加到txt中,在这里进行选择即可,没有的话,直接点击下一步,
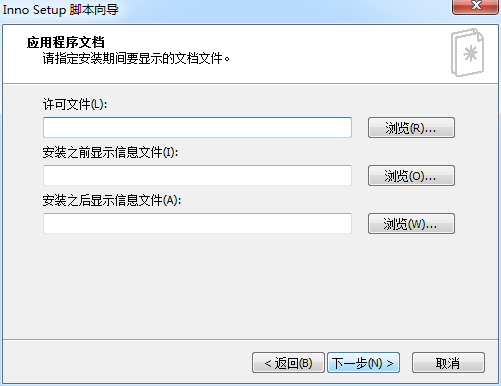
语言我这里选择简体中文,然后点击下一步
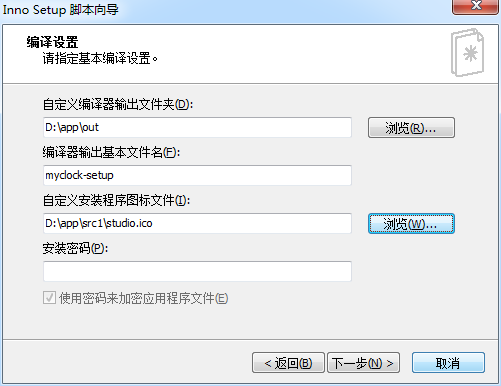
自定义编译器输出文件夹选择刚刚新建的out文件夹,
编译器输出基本文件名称自行填写,
图标选择为src1文件夹中的图标,没有可以不选,
点击下一步,不管,继续下一步,点击完成。
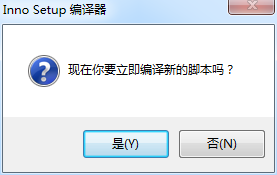
选择是
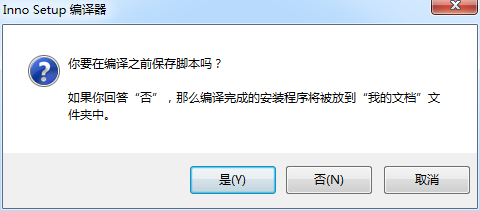
选择否,
然后看到控制台开始编译了,
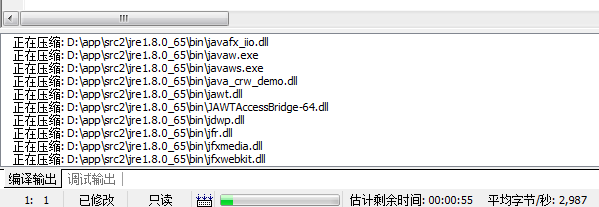
直到在控制台看到编译完成的信息后,可以在out文件夹中看到编译好的exe安装程序,此文件就是一个可在其他Windows计算机上运行的桌面应用程序,不管对方有没有jre环境都会正常运行。
好了,到这里打包结束。
